Hello, readers! Although we are no longer posting new items on our blog, we are keeping it available so you can browse through our past posts. Thanks for visiting!

Nov 30, 2011

{A Gingerbread Christmas}


'Tis the season for holiday decorating...and my house is finally--after several days of boxes and messes and chaos--looking like it's Christmas Season. I love it!

 I have an obsession with gingerbread. Real, fake, anything gingerbread. I love the taste and the playfulness of the candy decor. I love the colors of the candy and white icing against the dark brown of the gingerbread.

I have dreams of living in the witch's house from Hansel and Gretel.
Wouldn't that be awesome?!
But if I lived there I wouldn't trick children into thinking I was a sweet little old lady and then try to fatten them up to eat them.

Here is a glimpse of my gingerbread collection:


I'm not usually one who likes "cutesy" decor, but when it comes to gingerbread decor, the cuter the better!

I've also collected gingerbread ornaments for years...and I have enough that I think I can title my 9-foot tree a "Gingerbread Tree."


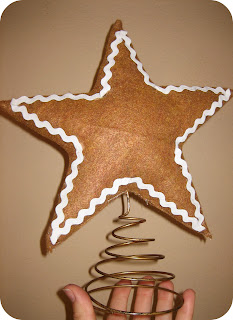
Well, I figured it was high-time that my gingerbread tree had a tree topper that matched it's decor...so I made my own gingerbread star topper!


I bought some brown felt and white rick-rack and whipped this up in about 20 minutes.

I printed out a large star (using the basic shapes in MSword) for a pattern, cut out two layers of felt, sewed them right-sides-together, leaving a couple inches at the bottom open, turned it right-sides-out, stuffed it with batting and a wire coil (stolen from my old tree topper), and then whip-stitched the opening by hand, reinforcing the area around the wire coil to hold it in place.


I think my gingerbread tree is now, officially, properly topped.


Happy Holidays!
--Tammy


Pin It

Nov 2, 2011

{Benefit For Becca}

Hello, everyone!
We've been swamped lately (again) with life and family and work and vacations and holidays, but we wanted to make a quick post on behalf of our cousin, Becca.


"Becca was recently diagnosed with Myasthenia Gravis.
She is a wonderful wife and mother to 6 children, three under the age of 5 and two with autism. Needless to say, her hands were already very full before this debilitating disease hit.

Myasthenia Gravis is a chronic condition that causes muscles to tire and weaken easily. Common muscle groups that are affected may make it difficult to chew, swallow, smile, shrug, lift your arm up, grip, rise to a stand, or walk up stairs.

When the muscles necessary for breathing are affected, a patient is said to be in myasthenic crisis.
This is a life-threatening situation.
Currently she is taking a large dosage of Prednisone to avoid any breathing difficulties.

She is scheduled to get her thymus removed (thymectomy) on Nov 10, 2011. Thymectomy seems to improve symptoms of Myasthenia Gravis patients. Typically this is an "open chest" procedure, however, she has located a doctor in Texas that is able to do it laproscopically (which will have a much faster recovery time).

As you can imagine, this unexpected family crisis will take quite a toll on Becca, emotionally and financially. She also will not have full insurance coverage since the surgery will be out of state  and she does not qualify for any programs (such as disability) as of now.

Any funds raised will be used for medical and travel expenses (from Utah to Texas) to assist her during her fight against MG."

* * * * *

Our family has set up a fundraiser site for anyone who can help out.  If you, or anyone you know, can spare even small amount of money to help Becca and her family get through this, it will be very much appreciated.

You can access her fundraiser page by clicking the following link:


THANK YOU!

If we can answer any questions for you, please don't hesitate to email us at PeppermintPlum[at]Hotmail[dot]com.


Pin It

Oct 21, 2011

{Minnie Mouse Party!}

My baby turned three this past week, and we decided to celebrate by honoring one of our favorite Disney characters...

M I N N I M O U S E !


Thanks to pinterest, I found some really cute cupcake ideas. I found these polka-dot wrappers at Michaels. The ears are mini Oreos, and the bows are fashioned with Fruit by the Foot.


I made Mickey and Minnie ears for our guests. I bought cheap headbands at Dollar Tree and wrapped them with black ribbon (hot glued the ends). The ears are made out of fun foam.

It was so fun to see everyone wearing them...even the big tough men kept their Mickey ears on all night!

:)

I'd share pictures, but I'm pretty sure I'd regret it.


I used some big hurricanes and apothecary jars to decorate the table. One was filled with red Dollar Tree Christmas ornaments, and the others were filled with red licorice and marshmallows.


And....here is the Birthday Girl herself!


It was a fun night!

--Tammy

Pin It

Oct 13, 2011

{Magic PB Cookies}


One of my favorite freshman-year memories is coming home from a hard day of classes and finding my roomate, Saralyn, donning her apron. That meant cookies were coming our way! These were some of our favorites.

The best part about these cookies is that they only have
.
..get ready for it...

THREE
ingredients.

For reals.


They are also GLUTEN-FREE for all my GF friends out there.


{Magic PB Cookies}
1 cup peanut butter
1 cup sugar
1 egg

18 Hershey's Kisses for tops


Preheat oven to 350. Combine sugar, peanut butter, and egg.  Shape into 1 inch balls and place on ungreased cookie sheet. {I usually use a small cookie dough scoop, which leaves them with a rougher texture but is much quicker!} Bake for 10 minutes.

While baking, unwrap 18 Hershey's Kisses and set aside. When you remove cookies from oven, immediately press a Kiss into the center of each warm cookie.

Wait about 10 minutes for the chocolate to melt, and then pop one of these babies into your mouth whole. I promise you won't regret it.

Enjoy!

-Tammy

*Please check our Linky Party tab or our sidebar for the weekly parties we participate in*

Pin It

Oct 5, 2011

{Skeleton Portraits}


OoOoOoOoh, spooky!

Want to make your own?
All you need are some basic crafty supplies that you probably already have laying around.


I found two gold frames at Savers thrift store back in March of this year and I grabbed them with this very project in mind!  Once October arrived, I knew it was time to put them to use.

I sponge-painted the frames with black craft paint, allowing some of the gold to still show through.

I then printed out this skeleton head:
and cut out the skull, jaw, eyes and nose with an exacto knife.
I then taped it onto some burlap and sponge-painted the areas I wanted to be black.

Once the paint was dry, I cut a large oval around the painted image and hot glued the burlap directly onto the back of the frame.

(Does anyone else hate working with burlap?  Yuck, so itchy and messy!  Why do projects with burlap have to turn out to be so cute?)


Once the burlap was secured to the back of frame, I tied 2 bows out of orange and white polka-dot grosgrain ribbon.

I then hot glued the bows to the burlap.

A dapper bow-tie for the gentleman:


And a lovely hair bow for the lady:

You should definitely add some Skeleton Portraits to your Halloween decor this year!

-Annie

*Please check our Linky Party tab or our sidebar for the weekly parties we participate in*

Pin It

Sep 27, 2011

{Halloween Mantel}

Annie and I both LOVE Halloween.

Don't tell Santa, but it might just be our favorite holiday.
{Both of our birthdays are within a week of the 31st...I wonder if that has anything to do with it?}

I usually wait until October 1st to break out the decor, but this year we are leaving town a few days before Halloween, so I need to get my full month of spooky in a little early.


 I decided to forego the traditional orange and black for my Halloween mantel this year, and went with black and white with a cute little pop of green:


I won a print of my choice in a contest a few months ago, and I am so happy I chose this one! It makes me smile every time I look at it.

It's called "Family Portrait," by The Dreamy Giraffe.
She still has it available in her etsy shop.


Do you SEE that little monster baby?!
OH. MY. GOODNESS.
It seriously makes me baby hungry.
{Yes, I'm nuts; I know this already.}


This is a cute little felt spider I stuck onto the mirror with a piece of Scotch tape.


I found these glittery black pumpkins on after-Halloween clearance at Target last year for 90% off. They were practically free!
Seriously...who can pass up ANYTHING at 90% off? Not me!


I'm so excited for Halloween!

--Tammy

The Lettered Cottage


Pin It

Sep 22, 2011

{BANANA Banana Bread}


For years I searched for THE perfect banana bread recipe, and this is definitely it for me. It's a little different from most banana breads...it has FIVE bananas in one loaf! This means it has tons of banana flavor and is incredibly moist. 


BANANA Banana Bread
(adapted from allrecipes.com)

2 cups flour
1 tsp baking soda
1/4 tsp salt
1/2 c butter
3/4 c brown sugar
2 eggs, beaten
1-2 tsp cinnamon
1 tsp vanilla
2 1/3 c mashed over-ripe bananas (4-6 depending on size)

Preheat oven to 350. Lightly grease one 9x5 inch loaf pan

In a large bowl, combine dry ingredients. In separate bowl, cream butter, brown sugar, and vanilla. Stir in eggs and mashed bananas until well blended. Stir banana mixture into flour mixture; stir just to moisten (do not over stir or it will be crumbly). Pour into loaf pan, bake for about 60 minutes, until inserted toothpick comes out clean. Let cool for 10 minutes in pan, then turn onto wire rack.


Go bananas!

-Tammy

*Click HERE to see all the linky parties we participate in!*

Pin It

Sep 18, 2011

{Ghostie BOO Garland}


Here's a quick and easy-to-follow photo tutorial on how you can make your own Ghostie Boo Garland!


Tissues (2 for each ghost, layered)
Cotton balls (4 for each ghost head)
Floss or white thread (to tie around neck)
Black marker (to make eyes)
Embroidery floss (to string ghosties onto)
Long needle (to poke through ghostie neck)


Once all of the ghosties are strung, you can make "BOO" tags to hang inbetween each one, or you can leave it just as it is.


I stamped the word "BOO" in black ink onto bright orange card stock.
I cut a "V" shape at the bottom and used black chalk to distress the edges.  I then folded the top of the card stock over the string and stapled the paper together, close to the string, to keep it in place.


That's it!
Hang it somewhere spooky and awesome and you're good to go.


Most importantly...  have fun!

-Annie

*Click HERE to see the linky parties we participate in!*

Pin It

Sep 14, 2011

{Halloween Printing with Fruits + Veggies}


I was cleaning out the fridge today, about to throw away some carrots and apples that didn't get eaten (shh.. don't tell my mother!) and I thought

"Hey wait a minute, I can be crafty with these!"

And... so can you!


All you and your little punkin's need to make some printed Jack-o-Lantern's is an apple, a couple of carrots and some craft paint.

Cut some shapes into the thick end of the carrot. I cut a triangle and a rectangle.  The long carrot stem makes these "stamps" really easy for small hands to hold when stamping.


Slice off one side of the apple.  Don't cut too closely to the core or else your stamp will look like an apple instead of the pumpkin shape you are going for.

Then, take the apple slice you just cut off and cut it in half to make a curved mouth.  You can keep it just how it is or make a few notch/cuts to make teeth.

Spread some paint out onto paper plates, grab some white paper and get stamping!

Super-easy, super-fun.

If you cut out each individual pumpkin print (once it's dry of course) you can string them onto a garland, or make them into a magnet or even gift tags to tie onto a loaf of pumpkin chocolate-chip bread for your neighbors (or to send directly to me... mmm).

-Annie

Pin It
Related Posts Plugin for WordPress, Blogger...