Hello, readers! Although we are no longer posting new items on our blog, we are keeping it available so you can browse through our past posts. Thanks for visiting!

Dec 14, 2010

{A Plum-Perfect Person We Adore}

I'm starting off our feature segment with a recent post from one of my very favorite bloggers... Tia from ChristopherAndTia!

Not only do they have the most beautiful children (seriously... they rank right up there with my darling nieces and nephews) but Tia makes all of her postings meaningful and fun.  I have loved reading about her family and their day-to-day life over the past few years and I think you will, too.

Her recent post is a tutorial on how to make these super-cute, mini yarn-wrapped wreath ornaments!


*squeeee*

Oh, my goodness!  Yarn-wrapped wreaths are becoming quite the rage these days, but this is the first time I have seen mini ones.

I was instantly smitten.

Please... do yourself a favor and check out this fun tutorial and meet the awesomeness that is ChristopherAndTia!


Enjoy!

-Annie

Pin It

Dec 13, 2010

{Antiqued Sewing Desk}


I found this sewing desk on craigslist for $25. 
With my niece helping me, we painted it an antique white color, sanded the edges, and glazed it with this amazing stuff:

General Finishes Furniture Glazes

Here it is all finished!


I love making stuff look old and roughed up.
I really love how we didn't glaze inside the ridges on the drawers so you can really see the design pop out.

I also found this chair at Goodwill for $6 and used the same painting/glazing technique as the desk, then recovered it with new fabric that makes me happy. I doubled up on the foam so that my tush can be a little more comfortable during long sewing sessions. 


YAY!
I love my new desk and chair.
Now I just need a sewing room to put it in instead of the corner of my bedroom.
A girl can dream, right?

--Tammy 


linking to...
Power of Paint Party


Pin It

Dec 12, 2010

{Peppermint Pretzel Kisses}

These are my favorite Holiday treats.  Anytime treats, really, but I only make them around Christmas.  They are way too tasty and addictive to make any other time of year!

I first saw the recipe for pretzel hugs on Becky Higgins' blog about three years ago and instantly fell in love....

....as will you.
Ingredients:

Pretzels
Hershey Kisses or Hugs
{I used Candy Cane/Peppermint kisses here}
M&M's
Pre-heat oven to 200*.  Line pretzels on baking sheet and place one un-wrapped (duh) Kiss on top, centered as much as possible to avoid a melty-chocolate mess.
Place in oven for 5 to 8 minutes.  Keep your eye on them!  They melt quickly. 
Once the Kiss has started to melt and spread over the pretzel, take them out of the oven.
Place one or two M&M's on top of each Kiss (this is a grown-up job... the chocolate is hot!)

Now comes the hard part:  Waiting for them to cool and set
This can take a very long time if just left on the stove/counter.
The best way is to place them in the fridge or freezer (still on the baking sheet) until they are firm.


That's all there is to it!  Like I said, uber-addictive so pace yourself.
Better yet, hurry and wrap them as gifts so you don't over-do it.
Enjoy!

-Annie

Pin It

Dec 11, 2010

{Butter Toffee}


Christmas is not complete without homemade candy. My mother-in-law is a pro at vanilla fudge, caramels, and pecan logs. I can make all of those with her hand-holding (and in her kitchen), but the only candy I am brave enough to make on my own is toffee. It is really simple to make, and makes a great gift for anyone.
Seriously…who doesn’t love toffee?
The only requirement is a candy thermometer. They are pretty inexpensive. Our family likes the Taylor brand. You also need a heavy-bottomed pot. I usually double this recipe and use a 3 qt. saucepan, but when I make the single recipe I use a 1.5 qt. pan. If you use too big of a pan your candy will be too low to reach the thermometer.

Butter Toffee
2 sticks butter
1 cup sugar
2 tsp water
2/3 cup almonds (optional)
1 cup chocolate chips

Melt butter in saucepan over low heat. Add sugar and water and stir (with a wooden spoon) until sugar dissolves. Turn heat up to medium hook your candy thermometer onto the pan. Continue stirring until you can see the color start to turn from light yellow to a golden brown. Add the almonds (optional).

TIP: Do not remove your wooden spoon from the pan or it can crystallize your whole batch of candy when you put it back in.

Now continue stirring and watch that thermometer like a hawk! I actually kneel down so I can see it at eye-level, but I’m really tall so some of you might not be able to kneel…just bend over and watch it. The temperature for toffee can range from 270 to 300, depending on your altitude. Here in the mile-high city I have found 275 to be perfect for this recipe. You might just have to experiment with this, so buy lots of butter and be prepared to try a test batch. If it’s a little chewy instead of crunchy after it cools then you didn’t cook it long enough, and if it has a burned flavor then you cooked it too long.

Very quickly pour mixture onto a cookie sheet. I use my Silpat. Don’t worry about what shape the toffee ends up in. Wait about 5 minutes, and then sprinkle chocolate chips on top, and then wait for 5-10 minutes for them to melt completely, and then spread evenly with a rubber spatula.

Now comes the hardest part…waiting for the toffee to completely cool before you break it up and snitch a piece! I like to put mine on the cold floor of my garage to speed up the process. You can use your fridge, too. It is best for the chocolate to be very cold before you break it up…and then it will break cleanly along with the toffee.


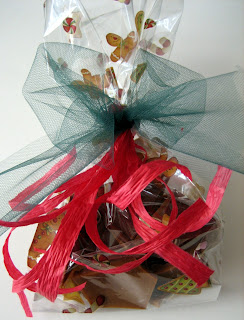
Wrap up a few pieces in a really cute way (see this post from Annie for some great ideas), and you have an impressive homemade gift for neighbors, teachers, or friends.
Make some for yourself too…you deserve it after all you do to get ready for Christmas!
(Do you think this philosophy is the reason I gain about 5 lbs during the month of December?)

--Tammy
Linking to:
Funky Junk's Saturday Nite Special


Pin It

Dec 10, 2010

{Garnished Gift Box}

Going along with my rule that presentation is everything when giving gifts, these Garished Gift Boxes are simply perfection.
Quick to make + endless decoration possibilities!
You can definitely let your own personality shine through which shows you care (and are totally crafty!)


I have a tendency to save empty cartons that I use throughout the year, just knowing that sometime down the road, I'll come up with something brilliant to make with them.

Observe:

Ooh yeah, cheese.  Mmmm.
As you can see, I had a bunch to work with.
And guess what?  They are perfectly sized for gift cards!
Hooray for laughing cows.

Steps to creating your own Garnished Gift Box:

1. Peel off the labels from the top, bottom and around the sides.
Some of the box paper may come off, but no worries. It looks more rustic that way.

2.  Paint the box and lid, distress as you see fit.  Let dry.

3. Cut a circle of decorated paper (I used old music sheets) to fit on top of the lid.
Crinkle the circle, open up and flatten slighty.
Ink the crinkles and around the sides of the circle, either with distress ink or chalk or even paint.

4. Glue the paper circle on top of the painted lid, with a glue stick.

Now, it's time to get creative and come up with the bling for the top!

I found this tutorial on how to make some awesome felt flowers, so I made my own versions.  I'm really digging my red poinsettia!

Here's a visual tutorial of how I made my flowers:


Your flowers can be cut to any shape to achieve different looks.  My green flower has heart-shaped petal.  This red poinsettia has double-points petals for the bottom layer and single leaf-like petals for the top layer.

Once you cut your felt pieces, grab the glue gun.
Put a dab of glue at the base of each petal and squeeze together to get it to hold the 3-D petal shape.
Glue the larger cirle of petals in an even circle onto the round piece of felt (seen in step 6).
Glue the smaller petals evenly around the top of the larger circle (step 7)
Glue on some bling to the center of the circle.

Hot glue the entire flower to the top, center of your painted box and you are done!
Fill the inside with crinkly basket shred, or even some fluffy cotton, and place your gift card inside.

ENJOY!

-Annie

Visit thecsiproject.com

 
Pin It

Dec 9, 2010

{5-Minute/5-Dollar Christmas Centerpiece}

Do you have 5 dollars? Do you have 5 minutes? 
Combine the two and you can have a snazzy Christmas centerpiece!

You'll need:
3 sizes bulb ornaments
1 plate
1 glass candlestick holder
floral berries or other pretties
Gorilla Glue or other all-purpose adhesive
wire clippers

I picked up everything you see here from Dollar Tree, except for the biggest bulbs...they came from the Dollar Spot at Target. I love these new plastic bulbs that I've seen popping up everywhere...they really look like glass but they are much less expensive and much safer...especially if you have little ones!


Glue the candlestick holder onto the center of the bottom of the plate. I used Gorilla Glue. 


Arrange the bulbs on the plate any way you want them. I started with the largest on bottom and then balanced them upward from there. I love the mix of shiny/matte/glittery.


Next, I clipped the berries apart and stuck them in around the bulbs. 

Guess what? That's it. You're done. That might have even been less than 5 minutes! I only used about half of the bulbs, so I'll save them for another project. 


Go ahead and make yourself a new display for your next holiday gathering. You will wow your guests with elegance and style...and you'll be the only one who knows it came from the dollar store. 

--Tammy

.....linking to.....


Funky Junk's Saturday Nite Special

Pin It

Dec 8, 2010

{An Easy Gift For Neighbors + Friends}

I'm sure everyone has seen the "we whisk you a merry kissmas" gift idea.
This is my cuter version, with an added little sweet:

That's right!  A "BERRY KISSMAS" my friends!


It's fairly inexpensive to make...around $2.20 per gift, and it couldn't be easier to whip up!

The Goods:

 3-pack of whisks at Target = $2.99 ($1 each)
Blueberry muffin mix = $0.77 each
Bag-o-Kisses = $2.50
Plastic Wrap or Cellophane
Strong Packing Tape (or double-sided tape)
Ribbon


* Stick a handful of Kisses into the whisk and wrap tightly with the plastic wrap.
* Secure at the top with a little tape.
* Tape the wrapped whisk to the front of the muffin bag.
* Layer some ribbons and tie in a bow around the whisk handle.
* Tie on the gift tag


Please feel free to use the tag I created (up at the top). You can either save that single-tag image directly to your computer and print it in any program, or you can click the "Green Tags" link below.  It will take you to a page of 6 printable tags, already created just for you! 

Green Tags

 Enjoy!

-Annie

....linking to....


Pin It

Dec 7, 2010

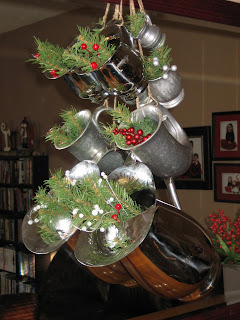
{Hanging Pitchers}

A few days ago I stumbled upon this post from Becky at Beyond the Picket Fence and it stopped me dead in my tracks. It's been a long time since I've seen something I love SO MUCH! 

I've always loved pewter pitchers and creamers but have never been able to figure out how to use them in my decorating. But then I saw this post and knew I had to have my own set of hanging pitchers immediately. So I ventured out with my 2-year-old in tow and hit the local thrift stores on half-price-day. Less than an hour later we came home with five metal pitchers and creamers, along with a grab bag of various floral scraps (I could tell there were a lot of red berries in there...one of my passions in life), all for a total of $15! I put my little one down for her afternoon nap and got to work on my project. By the time she woke up I was done! It was such a fun and easy project.


I hanged it in front of a mirror above my mantel (to copy Becky even further), and I love the way it reflects.


Pewter pitchers with red and silver berries...this combination will be included in my heaven. Along with Wallflowers plug-ins from Bath & Body Works. And Stephen's Hot Cocoa. And Coldplay.

--Tammy
p.s. Annie hates Coldplay. She'd want me to make that clear.

Pin It
Related Posts Plugin for WordPress, Blogger...