Hello, readers! Although we are no longer posting new items on our blog, we are keeping it available so you can browse through our past posts. Thanks for visiting!
Showing posts with label recipe. Show all posts

Jan 18, 2012

{Fudge Brownie Layered Ice Cream Cake}

A few years ago my niece was in town during someone's birthday and she offered to make the world's best ice cream cake...
UM...YEAH!
Go right ahead.
Turns out she was right. This cake rivals Baskin Robbins or Cold Stone any day.

Now this cake has become our family's tradition for birthdays. There just aren't enough birthdays in the year though. I could eat this every day!

The part that is the most fun is coming up with your favorite combination.
Ours is mint chocolate chip ice cream with oreos. But you could also use Grasshopper cookies...they are good, too. You can also do a chocolate-based ice cream and use Nutter Butters. The possibilities are endless with this cake!

You'll need:

1 box family size brownie mix
1/2 gallon ice cream
1 package oreos
1 bottle hot fudge (premium thick stuff)


Prepare brownie mix according to package directions, and pour batter into a greased springform pan. Bake for about 20 minutes (you'll want to underbake these a bit.. You won't be able to chew frozen, fully-cooked bites of brownie!). Cool completely.

Line the outside of the pan with whole oreos, pushing them down into the brownies a bit so they stay in place.


Spread half of the ice cream on top of the brownies:


Crush up the remaining oreos and sprinkle half of them on top of the ice cream:


Now it's time for the fudge. I like this Smuckers brand or Ms. Richardson's. But make sure it's the thick stuff that comes in the bigger bottle.


It's easiest to dollop it all over evenly and then start spreading it around.


This is the trickiest part...just spread it as evenly as you can.


Next, layer the rest of the ice cream on top of the fudge. This is a little tricky, too...I always have to use my finger to help, but then you can spread it smoothly and evenly with a hot spatula or something when you are done to make it nice and even.


 Finally, sprinkle the rest of the oreo crumbles on the top. Wrap it up in foil and freeze for several hours or overnight.


When you are ready to serve, remove the foil and undo the springform pan. You will be left with this beautiful masterpiece:


 Slice it, plate it, and ENJOY the heaven that is this cake!

-Tammy

*Please check our Linky Party tab or our sidebar for the weekly parties we participate in*

Pin It

Sep 22, 2011

{BANANA Banana Bread}


For years I searched for THE perfect banana bread recipe, and this is definitely it for me. It's a little different from most banana breads...it has FIVE bananas in one loaf! This means it has tons of banana flavor and is incredibly moist. 


BANANA Banana Bread
(adapted from allrecipes.com)

2 cups flour
1 tsp baking soda
1/4 tsp salt
1/2 c butter
3/4 c brown sugar
2 eggs, beaten
1-2 tsp cinnamon
1 tsp vanilla
2 1/3 c mashed over-ripe bananas (4-6 depending on size)

Preheat oven to 350. Lightly grease one 9x5 inch loaf pan

In a large bowl, combine dry ingredients. In separate bowl, cream butter, brown sugar, and vanilla. Stir in eggs and mashed bananas until well blended. Stir banana mixture into flour mixture; stir just to moisten (do not over stir or it will be crumbly). Pour into loaf pan, bake for about 60 minutes, until inserted toothpick comes out clean. Let cool for 10 minutes in pan, then turn onto wire rack.


Go bananas!

-Tammy

*Click HERE to see all the linky parties we participate in!*

Pin It

Sep 12, 2011

{Plum-Perfect Cupcakes}

IMG_4898-1


I shared this recipe at Snips & Spice a little while back.
If you haven't made them yet.... do it!  They are delicious!
* * * * *
I’ve been toying around with the idea of a plum cupcake for a while now, and decided this was the perfect chance to experiment.
I have to say that I think these turned out really tasty. They have a plumb-perfect blend of sweetness {from the frosting} and tartness {from the filling}.

You’ll need to plan ahead a little for this recipe…the plum sauce takes about 10 minutes to make and at least an hour to chill in the fridge before it is cool enough to use.

{Plum Perfect Cupcakes}
1 white cake mix
3 fresh plums
8 oz cream cheese
1 cube butter, room temp
3 Tbsp prepared plumsauce (see below)
1 tsp vanilla
7-8 cups powdered sugar (approx 2 lbs)
First, you will need to make your plumsauce filling. Cut fruit (with skin) from the pit of 3 fresh plums and process in a blender or food processor until the skins are chopped and blended in. Pour into small saucepan, and simmer for about 10 minutes, until the texture resembles that of applesauce.
IMG_4887

Pour into separate bowl and refrigerate for one to two hours, until sauce is cool to the touch. To speed up the process, stir sauce a few times while it is cooling.
IMG_4889

Next, preheat your oven and mix cake batter according to directions. Fill cupcake liners 1/2 full, and bake for about 15-17 minutes at 350. My mix made 30 cupcakes.
Allow cupcakes to cool.
Reserve about 3 tablespoons of cooled plum sauce to add to your frosting.

To fill cupcakes, pour remaining plum sauce into a pastry bag with a round tip, stick tip directly into the center of the cupcake, and squeeze a little sauce into each one.
filled cupcake 1
IMG_4904

Once filled, your cupcakes are ready for frosting.
This recipe makes a large amount of frosting, because I like to swirl big heaps of it onto my cupcakes. Feel free to halve the recipe if you don’t want as much on yours.
{Frosting}
Mix cream cheese, butter, 3 Tbsp plumsauce, and vanilla with hand mixer until well-blended. Slowly add powdered sugar one cup at a time until thick enough to pipe and hold up.
IMG_4898-1

Frost, Decorate, and Enjoy!

-Tammy

Pin It

Sep 2, 2011

{Oven Taco Fries}


We've got another delicious recipe to share with you today.  Don't worry, some craftiness is just around the corner....

These oven taco fries are super simple to make and they taste great!
(Lot's of step-by-step photos to come... as a visual learner myself, I thought it might be helpful)

* * * * *

Step 1:  Preheat oven to 475*
Step 2: Grab some potatoes

These taste best with the skin left on, so be sure to wash and scrub the potatoes well to remove all of the dirt.

Step 3: Cut the potatoes into thin, even slices. Try to keep them all the same thickness so they all cook in the same amount of time.
If you like your fries crispy (who doesn't), cut them fairly thin.


Step 4:  Place the cut potato slices into a bowl of hot water and let them soak for 10 minutes or so.  This will remove some of the extra starch that prevents them from getting crispy.

Step 5:  While the potato slices are soaking, take a few minutes to make some cute paper pouches to serve them in!  (Pouch how-to below)

Step 6:  Remove the soaked potatoes from the water and pat them dry with paper towels.  You want to get all of the water off so that the oil and taco seasoning will stick well.


Step 7:  Place the potatoes back into the bowl and mist them with some Pam olive oil spray.  Open a packet of taco seasoning and sprinkle half the packet over the potatoes.
Stir all around to ensure that all slices are covered in taco seasoning yumminess.


Step 8:  Place the potato slices onto a foil-lined baking sheet in a single layer. They can be touching, but if they are not in a single layer, they won't all get crispy (and that will make you sad).


Step 9:  Time to cook! Pop the sheet into the oven and set the timer for 10 minutes.
The total baking time will be approximately 35-50 minutes, depending on how thick or thin your slices are.

The trick to getting them crispy is to turn the slices after each 10 minutes of cooking.
Once the potatoes are fully cooked, you can also place them under the broiler for a minute or two to finalize the crispiness -- just be sure to watch them constantly so they don't burn.

Once they are finished, take them out of the oven and serve immediately while they are hot and delicious!

* * * * *


Supplies needed:

Parchment paper
Scrap paper
Pencil
Scissors


Make a template with the scrap paper. Cut it into an 8.5 in x 8.5 in square.
Trace this square onto the parchment paper then cut it out.  When cutting the parchment, be sure to cut just inside the pencil line so you don't get any pencil lead on your food.  Gross.

Then, proceed as follows:


Then make as many as you need. Fill each pouch with the baked, crispy taco fries and eat 'em up!

Yum.

-Annie

*Check the sidebar or top page to see the linky parties we participate in*


Pin It

Aug 26, 2011

{Our Favorite Meatloaf Recipe}


Ooooh, look at those. Yum!

We have a few of our favorite recipes we will be sharing with you over the next week.
Today, it's the most delicious meatloaf ever.

{MEATLOAF}
1 1/2 lbs Lean Ground Beef
2 Eggs, Beaten
1/4 cup Ketchup (plus more for tops)
3/4 cup Herb-Seasoned Dry Bread Stuffing Mix (Pepperidge Farms)
1/2 Package Dry Ranch Dressing Mix
6 oz can French Fried Onions

1) Preheat oven to 350
2) In a large bowl, combine all ingredients and mix well
3) Shape into a single loaf and fit into a 9x5 inch loaf pan or split evenly into smaller portions and fit into a mini-loaf pan (as pictured)
4) Smother the top with additional ketchup
5) Bake, covered loosely with foil, for 50-60 minutes or until meat is thoroughly cooked.
(If using a mini-loaf pan, check after 45 minutes, as the mini-loaves can cook a bit quicker)
6) OPTIONAL YUMMINESS:
Sprinkle on additional fried onions during the last 5 minutes of baking

*be mindful of over-baking, as this can cause the meatloaf to dry out quickly*


Try it!  You wont be disappointed.

Enjoy!

-Annie


Pin It

Aug 24, 2011

{Chewy Chocolatey S'MORES Cookies}

IMG_4864-1

There have been some really great S’Mores-themed goodies all over blogland this summer. I decided to try the idea with my favorite chocolate cookie recipe, and man, they were yummy!
These are a great way to celebrate the last few weeks of summer.

Here is the basic recipe:

{Chocolate Cookies}
1 1/2 sticks butter
2/3 cup sugar
2/3 cup brown sugar
2 eggs
1 tsp vanilla
1/2 cup cocoa powder
1 tsp baking soda
1/2 tsp salt
2 1/2 cups flour

Cream butter and sugars, and then add eggs and vanilla. Gradually add dry ingredients. Roll into small balls and place onto greased or parchment-lined cookie sheet. Bake at 350 for 10 minutes.

{For S’Mores Variation}
Break up some graham crackers into 1-inch pieces, and stick two into the sides of the top of each cookie, at an angle. Break up a Hershey bar into the pre-scored rectangles, and then break each piece in half. Stick one in the top of each cookie, also at an angle, so you have a little cavity to put a mini-marshmallow right on top without it rolling off:

IMG_4856-1

Bake at 350 for about 10 minutes.

Enjoy!

-Tammy


Pin It

May 4, 2011

{Make Your Own TWIX}

I have always loved me a TWIX bar.
I may or may not have eaten one every day for lunch in 7th grade.


So...when I came upon a few different recipes for homemade TWIX bars I knew I had to try them out! I have since made these many times and have tweaked the recipe to my liking.

They really do taste like the real thing...maybe possibly even a little better!

{TWIX BARS}
48 Club Crackers (a few more than one sleeve)
1 c. graham cracker crumbs (one sleeve)

1/3 c. sugar
3/4 c. brown sugar
1/3 c. milk
1/2 c. butter
Topping*:
1 1/2 c. semi-sweet chocolate chips
1 1/2 c. vanilla baking chips
* Most recipes call for milk chocolate chips. I have tried milk and semi and I thought both were good....but one day all I had was 1/2 a bag of semi, so I decided to add vanilla chips to them, and it turned out to be the perfect combination for my taste buds! I do it this way every time now.
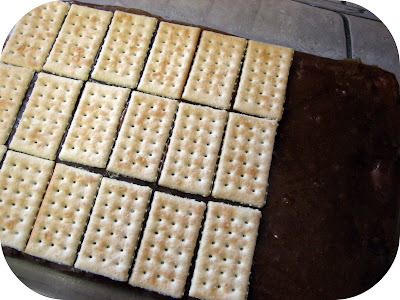
Place one layer of Club Crackers in a lightly greased 13×9 casserole dish.
Use your food processor or blender to make graham cracker crumbs, and pour into a heavy sauce pan. Combine remaining ingredients into pan and heat over medium heat until it comes to a boil, stirring constantly. Boil for 5 minutes (continue to stir). It should look (and smell) like caramel.
Carefully pour mixture over crackers.
Immediately place another layer of Club Crackers on top, pushing them down into the caramel mixture gently.

 Melt chocolate chips in microwave (on high in 30 minute second increments [thanks to a reader for pointing out that mistake!], stirring between each), and pour on top of crackers.
Refrigerate until cool, and then cut and serve.
Enjoy!
--Tammy

Pin It
Related Posts Plugin for WordPress, Blogger...